LightTech
Informing the World
The Hydrautomat
 hydrautomat.jpg |  Hydrautomat Illustration.png |  Hyrdrautomat Cropped.JPG |
|---|---|---|
 Hydrautomat Schematic.jpgDrawing of the Hydrautomat replica. Note: Drawing does not give any particular dimensions of the device. It only acts as an aid for understanding what the device looks like, and where all the components on the Hydrautomat replica are located. | 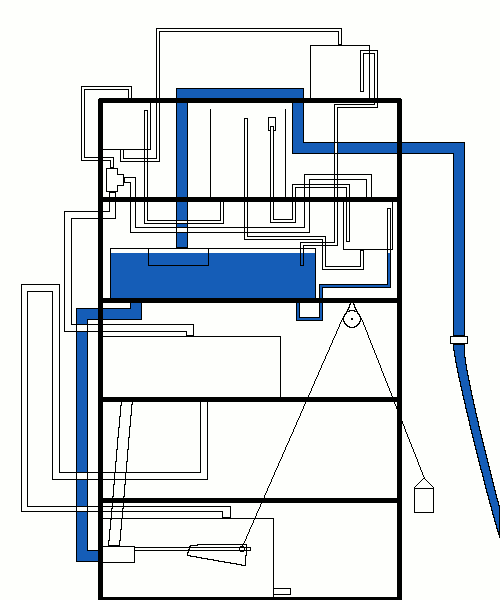 Hydrautomat Animation 1.gifEarly Hydrautomat GIF Animation |
The Hydrautomat (a.k.a. 'Water Staircase') is a self-powered water pump that was invented in the 1920's by Thomas Gaskell Allen. It uses both air and water pressure to lift water upward into successively higher tanks. It was hailed as one of the greatest engineering marvels of the 20th Century, even prompting famous physicist Sir Oliver Lodge to opin: "I can only express my admiration of the simplicity and beauty of the invention, and my wonder that humanity has had to wait so long for the construction of an arrangement which must prove of the greatest service."
The Hydrautomat is a device that has a lot of promise for the world, especially for bringing water to areas where water pumps aren't readily available or are too expensive to operate.
Operation of the Hydrautomat
The Hydrautomat works by feeding water from the River Bed (B) into the bottom of the Operating Chamber through the Inlet Water Pipe (G), which then pressurizes the air inside the Operating Chamber, and subsequently pressurizes the two Closed Containers (C) that are connected to the top of the Operating Chamber by an Air Pipe (F). The water in these tanks is then pushed upward into the Open Vessel (D) and the Reservoir (E). The water eventually fills up the Operating Chamber until water starts flowing out through the Siphon Outlet (H) onto a paddle that is part of the Operating Mechanism (V). The paddle is then forced downward, and the lever running from the Operating Mechanism to the Inlet Control (W) is pushed upward, closing the Inlet Control valve.
The water then continues draining out from the Operating Chamber (A) through the Siphon Outlet (H). Which creates a vacuum in the Operating Chamber, and the two Closed Containers (C) via the Air Pipe (F). This vacuum then causes water in the River Bed (B) and Open Vessel (D) to be sucked upwards into the two Closed Containers. The Operating Chamber eventually drains, disengaging the Siphon (H), and the paddle on the Operating Mechanism (V) is forced upward by the counter-weight on the other side of the Operating Mechanism. The counter weight also returns the Inlet Control (W) to the open position, allowing water to flow back into the Operating Chamber and starts the process all over again.

Current Replica
The current replica of the Hydrautomat is a smaller version of the original, with plastic tubing and containers in place of metal pipes and containers. The lever-type switching apparatus that T.G. Allen used is replaced with a pulley-type switching apparatus. It is also housed within a plastic container, which increases the modularity of the device. The Feed Tank also has an automatic waterer and accompanying tube (Input Tube) to it as well, so a garden hose can be attached without difficulty.
This version of the Hydrautomat is essentially the same as the original. And is light-weight, easy to maintain, and affordable to build. And can readily be modified to suit whatever purpose it is intended for.

Current Hydrautomat Replica
Operation of the Replica Hydrautomat
The Hydrautomat works by feeding water from a water source (lake, river, garden hose, etc.) into the Feed Tank, which then feeds into the bottom of the Operating Tank. This pressurizes the air inside the Operating Tank, which then pressurizes the First Stage and Third Stage through the Air Tube that connects to the Operating Tank. The water in these tanks is then pushed out of the First and Third Stage, and into into the Second Stage and the Reservoir. The Operating Tank eventually fills up until water starts flowing out through the Siphon into a tray that is part of the Flow Switch. The Tray then becomes heavier than the counter-weight that keeps it held upward, and falls toward the bottom of the Drain Tank, This causes the Flow Switch to close.
Water then continues draining out of the Operating Tank through the Siphon, while the Feed Tank cannot replenish this loss of water due to the Flow Switch being closed. This creates a vacuum in the Operating Tank, and the two Closed Containers via the Air Pipe. This vacuum then causes water in the Feed Tank and Second Stage to be sucked upwards into the First and Second Stages. The Operating Tank eventually drains out, disengaging the Siphon, and the Tray on the Flow Switch is forced upward by the counter-weight. This opens the Flow Switch and starts the process all over again.

Hydrautomat .GIF Animation
Making The Hydrautomat
The Hydrautomat is relatively simple and easy to build. At first glance, it looks like a very complicated piece of equipment. But it's actually a very simple and easy device to build.
First, you'll need to get parts for the Hydrautomat. See the Parts List on the right for details.
After that, we'll start with making the Components for the Hydrautomat. You'll need a vise, a hole saw, work gloves, safety goggles, and some basic tools like adjustable pliers for this. See the video on the right for more information on drilling the containers and creating the fittings. Make sure that you use teflon pipe on the threads of the fittings to prevent leakage between the barb fitting and bulkhead fittings.
NOTE: There isn't one full-proof way that I've found for properly tightening the barb fittings into the bulkheads while maintaining the integrity of the threads of the plastic bulkhead fittings. As the vise will tend to rub against the plastic threads and deform them, essentially ruining the threads.
I've tried putting red gasket rubber between the threads and the vise to cushion the threads while the vise was tightened, but the rubber was so soft that it deformed under abrasion while screwing the barb fitting into the bulkhead fitting. And quickly gets destroyed in the process. You'll need to be creative in order to figure out the best way of accomplishing this feat. My recommendations would be to buy a harder rubber that can sit between the bulkhead and the vise, that won't deform. Something like a Buna-N or Polyurethane strips or angles perhaps.
Another Note: Bulkhead fittings vary in size, so remember to get the diameter of the threaded part of the fitting before you go and buy a hole saw for the fitting.
Hydrautomat Parts List -

After that, we'll start with making the components for the Hydrautomat.
First, we'll start with the Operating Tank. The Operating Tank is made from a 3 Gallon Refrigerator Bottle (Preferably made of a thicker, more rigid plastic like polycarbonate) and three bulkhead fittings. Two of these bulkhead fittings 1/2 inch, and one bulkhead fitting is 3/4 inch.
One 1/2 inch bulkhead fitting goes on the top of the Operating Tank, which is for the Air Tube. And the other 1/2 inch bulkhead fitting goes on the bottom of the Operating Tank (On the left, you can see the black 1/2 inch bulkhead next to the tan/gray 3/4 inch bulkhead fitting). The 3/4 inch bulkhead fitting is also located on the bottom tank. Always make sure that the barb fittings you get are for the Inner Diameter (ID) of the tubing, and not the Outer Diameter (OD).
The bulkhead fittings for the Operating Tank only have barb fittings on the outside of the tank, so nothing has to be done on the inside.
The spigot on the tank is not needed in the operation of the Hydrautomat, and can likely leak during operation. So it's best to unscrew the spigot enough to apply 5200 Marine Caulk between the seal of the spigot and the tank wall, and then screw the spigot tight, resulting in a better seal. Also seal the opening of the spigot itself (where the beverage would normally be dispensed from) and the rubber stopper) in the corner above the spigot) with caulk as well.
Now we'll move on to the series of open and closed containers that pump the water to higher levels. I call each of these containers Stages in order to distinguish one from another. There are 4 Stages, with the last still being called the 'Reservoir', as it is called in the patent.
The First Stage, or S1, consists of a one gallon container with four bulkhead fittings. Two of these fittings have Barb fittings on Both sides. The two fittings on the top of the container are for the Air Tube and Breather Tube (the Breather Tube connecting to the Second Stage, or S2). The two fittings on the bottom go to the Feed Tank and the Second Stage (or S2).
The Breather Tube fitting is the fitting with a section of tubing proceeding from the top of the container, and extending down to touch the bottom of the tank. This tube should be slightly longer than the height of the tank and curved at an angle, so that the mouth of the tube doesn't squarely fit against the bottom of the container, which could impede water from flowing into the tube.
The Tube that runs from the Feed Tank to the First Stage (S1), is the tube with the fitting with a section of tubing running from the bottom of the tank up to the top of the tank, this tube should also contact the surface of the container at an angle to ensure that water flow isn't impeded.
